GGshow reloaded GGshow reloaded

April 11, 2016

RPi RF Transmitter & Radio Controlled Sockets

Playing with my new toy – Pi-mote Control starter kit with 2 sockets.

Sample code – turn on all plugs for 5 seconds.

import RPi.GPIO as GPIO
from time import sleep
GPIO.setmode(GPIO.BCM)
GPIO.setwarnings(False)

GPIO.setup(17,GPIO.OUT)
GPIO.setup(22,GPIO.OUT)
GPIO.setup(23,GPIO.OUT)
GPIO.setup(27,GPIO.OUT)
GPIO.setup(24,GPIO.OUT)
GPIO.setup(25,GPIO.OUT)

GPIO.output(17,True)
GPIO.output(22,True)
GPIO.output(23,False)
GPIO.output(27,True)
sleep(0.1)
GPIO.output(25,True)
sleep(0.25)
GPIO.output(25,False)

sleep(5)

GPIO.output(17,True)
GPIO.output(22,True)
GPIO.output(23,False)
GPIO.output(27,False)
sleep(0.1)
GPIO.output(25,True)
sleep(0.25)
GPIO.output(25,False)

Complicated? There is an easier way, by using Energenie library.

Installing Energenie library

For Python 3

sudo apt-get install python3-pip
sudo pip-3.2 install energenie

For Python 2

sudo apt-get install python-pip
sudo pip install energenie

* pip is a package management system used to install and manage software packages written in Python.

Sample code – turn on all plugs for 5 seconds

from energenie import switch_on, switch_off
from time import sleep
switch_on()
sleep(5)
switch_off()

It is much easier now, doesn’t it?

Updated: 11/9/2016
To control each switch separately, hold down the green button on one switch for 10-15 seconds, send channel 1 on command, hold down the green button on the other switch for 10-15 seconds, send channel 2 on command.
Now I can switch on/off the plug separately.

from energenie import switch_on, switch_off
from time import sleep
switch_on(1)
sleep(3);
switch_off(1)
sleep(3);
switch_on(2)
sleep(3);
switch_off(2)

Now I’ll be able to automatically turn on my radio every morning to wake me up, or remotely turn on my rice cooker before I arrive at home 😉

Reference
Controlling electrical sockets with Energenie Pi-mote – Raspberry Pi
Energenie Documentation
Energenie Python library source code

March 31, 2016

RPi 5 inch HDMI LCD

Bought a 5″ HDMI LCD screen for my Raspberry Pi, but it wasn’t working until I made some changes at /boot/config.txt file to force 800×480 screen resolution, edit /boot/config.txt and modify these lines:

hdmi_force_hotplug=1
hdmi_group=2
hdmi_mode=87
hdmi_cvt 800 480 60 6 0 0 0

Raspberry Pi 5inch HDMI LCD


Optionally to enable support of MJPEG, VP6, VP8, Ogg Theora & Ogg Vorbis, add these lines:

start_file=start_x.elf
fixup_file=fixup_x.elf
Filed under: Internet of Things (IoT),Linux,Raspberry Pi — Tags: , , , , — GG @ 2:08 pm

February 27, 2016

RPi camera

Enabling camera on your RPi

  • sudo raspi-config
    

Terminal commands

  • To take a picture
    raspistill -o filename.jpg
    
  • To play a recorded h264 video
    omxplayer filename.h264
    
  • To record a slow motion video (10 seconds, resolution 640×480 pixels, 90 frames per second)
    raspivid -w 640 -h 480 -fps 90 -t 10000 -o filename.h264

Installing Python API for RPi camera

  • sudo apt-get install python-picamera python3-picamera python-rpi.gpio
    

Python code samples

  • Preview and capture a photo
    import time
    import picamera
    with picamera.PiCamera() as camera:
        camera.start_preview()
        time.sleep(10)
        camera.capture('filename.jpg')
        camera.stop_preview()
    
  • Capturing multiple photos
    import time
    import picamera
    with picamera.PiCamera() as camera:
        i = 0
        while True:
            camera.start_preview()
            time.sleep(1)
            camera.capture(str(i)+(".jpg"))
            i += 1
            time.sleep(5)
    
  • Capturing photo when push switch pressed
    * connect a push switch to GPIO2 & GND
    * use current timestamp as filename
    * save JPG when push switch pressed

    from time import gmtime, strftime, sleep
    import picamera
    import RPI.GPIO as GPIO
    GPIO.setmode(GPIO.BCM)
    button=2
    GPIO.setup(button,GPIO.IN,pull_up_down=PIO.PUD_UP)
    while True:
        with picamera.PiCamera() as camera:
            camera.resolution = 1920,1080
            GPIO.wait_for_edge(button, GPIO.FALLING)
            camera.start_preview()
            sleep(2)
            camera.capture(strftime("%Y%m%d%H%M%S",gmtime())+'.jpg')
            camera.stop_preview()
    

    A photo posted by @le_g_end on

    #raspberrypi #camera & #pushswitch

    A video posted by @le_g_end on

  • Recording a 10 seconds video
    from time import sleep
    import picamera
    with picamera.PiCamera() as camera:
        camera.start_recording('filename.h264')
        sleep(10)
        camera.stop_recording()
    
    
  • Video recording and playback
    import os
    while True:
        os.system("raspivid -w 640 -h 480 -fps 90 -t 10000 -o filename.h264")
        os.system("omxplayer filename.h264")
    

Reference

RPi Chapter 1

Preparation

  1. Download Raspbian and install it on SD card.
  2. Login using default username: pi, and password: raspberry
  3. Run Xserver
    startx
    
  4. Update and cleanup
    sudo apt-get update
    sudo apt-get upgrade
    sudo apt-get clean
    
  5. Installing packages
    sudo apt-get install {package}
    

October 19, 2015

PHP 400 Quota Exceeded in Analytics Data Import

Issue:

  • Google Analytics Data Import failed after 50 upload.
  • Unable to upload large file for Analytics Data Import.
  • Intermittent error 400 with Management API.
PHP Fatal error: Uncaught exception 'Google_Service_Exception' with message 'Error calling POST https://www.googleapis.com/upload/analytics/v3/management/accounts/.../webproperties/.../customDataSources/.../uploads?uploadType=media: (400) Quota exceeded.' in /base/data/home/apps/.../google-api-php-client/src/Google/Http/REST.php:110 Stack trace: #0 /base/data/home/apps/.../google-api-php-client/src/Google/Http/REST.php(62): Google_Http_REST::decodeHttpResponse(Object(Google_Http_Request), Object(Google_Client)) #1 [internal function]: Google_Http_REST::doExecute(Object(Google_Client), Object(Google_Http_Request)) #2 /base/data/home/apps/.../google-api-php-client/src/Google/Task/Runner.php(174): call_user_func_array(Array, Array)

Reason:
There are limits and quotas for Google Analytics Configuration and Reporting API. When daily project requests and daily write requests exceeded limit, API will return error 400.

Solution:

  • Fine-tune your application for quota usage; or
  • Request additional quota; or
  • Go to bed, try again tomorrow 🙂

Reference:
Configuration and Reporting API Limits and Quotas

Filed under: Google Cloud Platform,PHP — Tags: , , , , — GG @ 5:14 pm

PHP 403 Insufficient Permission in Analytics Data Import

Issue:

PHP Fatal error: Uncaught exception 'Google_Service_Exception' with message 'Error calling POST https://www.googleapis.com/upload/analytics/v3/management/accounts/.../webproperties/.../customDataSources/.../uploads?uploadType=media: (403) Insufficient Permission' in /base/data/home/apps/.../google-api-php-client/src/Google/Http/REST.php:110 Stack trace: #0 /base/data/home/apps/.../google-api-php-client/src/Google/Http/REST.php(62): Google_Http_REST::decodeHttpResponse(Object(Google_Http_Request), Object(Google_Client)) #1 [internal function]: Google_Http_REST::doExecute(Object(Google_Client), Object(Google_Http_Request)) #2 /base/data/home/apps/.../google-api-php-client/src/Google/Task/Runner.php(174): call_user_func_array(Array, Array) #3 /base/data/home/apps/.../google-api-php-client/src/Google/Http/REST.php(46): Google_Task_Runner->run() #4 /base/data/ in /base/data/home/apps/.../google-api-php-client/src/Google/Http/REST.php on line 110

Reason:
Insufficient permission to perform an API query

Solution:

  • Ensure sufficient account permission granted for the service account (???@developer.gserviceaccount.com).
  • Ensure proper scopes defined in Service Account Authentication (Google_Auth_AssertionCredentials).
    Use Google_Service_Analytics::ANALYTICS ( or “https://www.googleapis.com/auth/analytics” ) instead of Google_Service_Analytics::ANALYTICS_READONLY ( or “https://www.googleapis.com/auth/analytics.readonly” ) if you need to perform an edit operation, e.g. Data Import.

Reference:

June 6, 2015

When Pi open Windows

Microsoft released Windows 10 IoT Core Insider Preview today.

Download Windows 10 IoT Core Insider Preview with support for Raspberry Pi 2
Unzip Windows_IoT_Core_RPI2_BUILD.zip
Run Command Prompt as Administrator, navigate to the unzipped folder.

Insert SD card into card reader.
Install image file (flash.ffu) to your SD card.

dism.exe /Apply-Image /ImageFile:flash.ffu /ApplyDrive:\\.\PhysicalDriveN /SkipPlatformCheck

If your SD card is disk number 3, use /ApplyDrive:\\.\PhysicalDrive3
To find the disk number of your SD card:

diskpart
list disk
exit

Remove your SD card with Safely Remove Hardware. Your SD card is now ready to boot Windows 10. Insert SD card into your Pi, Connect HDMI monitor, network cable, power supply. Boot Windows 10 IoT Core Insider Preview.

Windows 10 IoT Core Insider Preview

Reference
PowerShell documentation

Filed under: Raspberry Pi,Windows — Tags: , , — GG @ 6:24 am

April 25, 2015

My first contact with Raspberry Pi

My new toys = berry + bread, lol

Raspberry Pi, solderless breadboard, HDMI, jumper, LED, switch, MicroSD...

Attended Raspberry Pi workshop today, learned Raspbian, Python programming, solderless breadboard, 7 segment numeric LED display…

One step further in exploration, one step closer to invention.

Filed under: Raspberry Pi — Tags: , , , , , — GG @ 5:03 pm

April 23, 2015

Google cloud storage for static website hosting

Synopsis

  • Using Google Cloud Storage as low cost yet reliable website hosting service for static webpages / files.

Requirements

  1. To host a static website on Google Cloud Storage, you need to create a Cloud Storage bucket with the domain/subdomain name as the bucket name.
  2. To create a domain named bucket or any bucket name contains dot (.), you need to pass the domain name ownership verification at Google Webmaster Tools.
  3. There are several methods to verify your site, however since you are creating a new storage to host your web files, I assume that you do not have an existing web hosting storage to store your HTML files at the moment, options by adding Meta tag, HTML file, Google Analytics or Tag Manager code might not be possible. Hence, adding new DNS records could be the only option that works for everyone.

Steps

  1. Creating DNS records
    Two new DNS records need to be created.

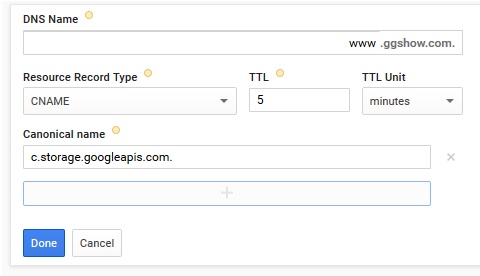
    1. A CNAME record of your subdomain hostname (e.g. www) with canonical name c.storage.googleapis.com.
      Creating CNAME record for Google Cloud Storage bucket
    2. Another TXT or CNAME record need to be created for Google Webmaster Tools domain ownership verification.
  2. Verify domain ownership
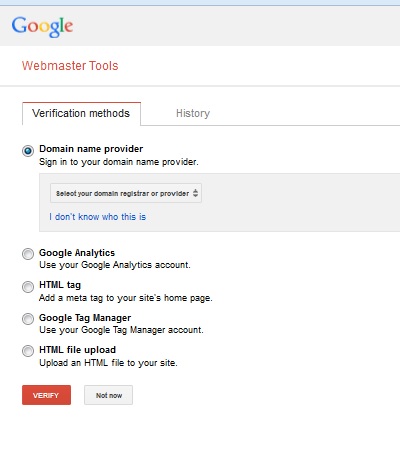
    Add your site at Google Webmaster Tools and verify the site ownership.
    Google Webmaster Tools site ownership verification
  3. Create bucket
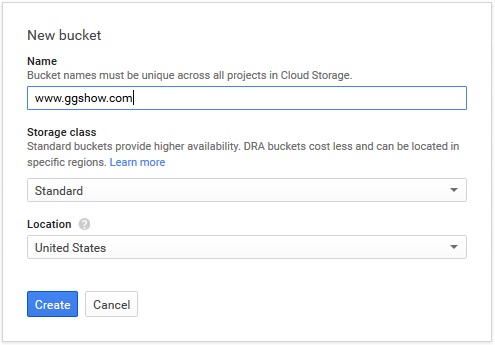
    At Google Developers Console, under Storage > Cloud Storage, create a new bucket.
    Creating new Google Cloud Storage bucket
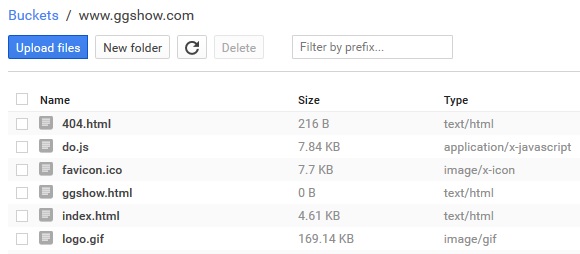
  4. Upload your web files
    Upload files to Google Cloud Storage bucket
  5. Set files permission
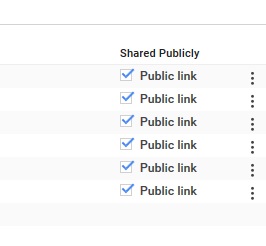
    From Storage Browser, enable public link option for all web files.
    Google Cloud Storage public link
  6. Edit bucket website configuration
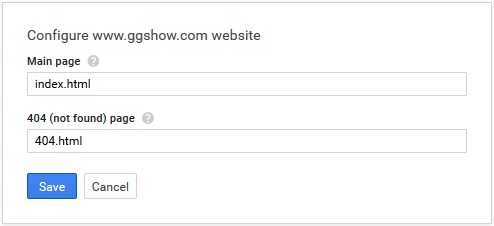
    Configure main page and custom 404 page for your website.
    Google Cloud Storage website configuration, main page and custom 404 page

Useful gsutil / gsutil.py commands
You can also change file permission and website configuration using gsutil command.

Configuring main page and custom 404 page:

gsutil web set -m index.html -e 404.html gs://www.ggshow.com

Enabling public read file permission for a single file:

gsutil acl set public-read gs://www.ggshow.com/file.html

Enabling public read file permission for all files in bucket:

gsutil acl set public-read gs://www.ggshow.com/*.*

Uploading local files to bucket

gsutil cp -R \var\www gs://www.ggshow.com

Copying an object (file or folder) from one bucket to another bucket

gsutil cp -R gs://www.ggshow.com/object gs://mybackup.ggshow.com

Moving files from one folder to another folder

gsutil -m mv  gs://www.ggshow.com/folder1/*.* gs://www.ggshow.com/folder2

List files in bucket

gsutil ls gs://www.ggshow.com

Reference

Grayscaling your website

A quick solution to convert webpages into black and white using CSS grayscale filter, supported by all major web browsers including MSIE, Firefox, Chrome, Safari. Suitable for making mourning page, paying tribute, & etc.

Demo

Convert the entire page into black & white:

body {
  filter: url("data:image/svg+xml;utf8,<svg xmlns=\'http://www.w3.org/2000/svg\'><filter id=\'grayscale\'><feColorMatrix type=\'matrix\' values=\'0.3333 0.3333 0.3333 0 0 0.3333 0.3333 0.3333 0 0 0.3333 0.3333 0.3333 0 0 0 0 0 1 0\'/></filter></svg>#grayscale");
  filter: gray;
  -webkit-filter: grayscale(1);
}

Convert selected elements into black & white:

.grayscale {
  filter: url("data:image/svg+xml;utf8,<svg xmlns=\'http://www.w3.org/2000/svg\'><filter id=\'grayscale\'><feColorMatrix type=\'matrix\' values=\'0.3333 0.3333 0.3333 0 0 0.3333 0.3333 0.3333 0 0 0.3333 0.3333 0.3333 0 0 0 0 0 1 0\'/></filter></svg>#grayscale");
  filter: gray;
  -webkit-filter: grayscale(1);
}

And add grayscale class to selected HTML elements. E.g.:

<div class="grayscale">
 ...
<div>

Print webpages in black & white:

@media print {
  .grayscale {
    filter: url("data:image/svg+xml;utf8,<svg xmlns=\'http://www.w3.org/2000/svg\'><filter id=\'grayscale\'><feColorMatrix type=\'matrix\' values=\'0.3333 0.3333 0.3333 0 0 0.3333 0.3333 0.3333 0 0 0.3333 0.3333 0.3333 0 0 0 0 0 1 0\'/></filter></svg>#grayscale");
    filter: gray;
    -webkit-filter: grayscale(1);
  }
}

CDN options
CSS also available on CDN.

Grayscale all:

<link rel="stylesheet" type="text/css" href="http://cdn.ggshow.com/styles/grayscale-all.css">

Grayscale selected:

<link rel="stylesheet" type="text/css" href="http://cdn.ggshow.com/styles/grayscale.css">

Grayscale print:

<link rel="stylesheet" type="text/css" href="http://cdn.ggshow.com/styles/grayscale-print.css">

Or using CSS import method:

Grayscale all:

@import url("http://cdn.ggshow.com/styles/grayscale-all.css");

Grayscale selected:

@import url("http://cdn.ggshow.com/styles/grayscale.css");

Grayscale print:

@import url("http://cdn.ggshow.com/styles/grayscale-print.css");
Filed under: CSS,HTML,Uncategorized — Tags: , , , , — GG @ 6:59 pm
Older Posts »

© 2024 GGSHOW | Powered by WordPress